Easy to make knitting stitch markers - a tutorial!
Every knitter will need need a bunch of knitting stitch markers at some point of time in their knitting career. And, there are a variety of stitch markers.. starting from a piece of yarn or a rubber band to the gorgeous beaded ones. My first attempt at beaded stitch markers went just fine but, I wasn't thrilled with working with jewelry findings. They weren't perfect in my eyes. So, I never gave them another try after that episode. But, these lovely beads in my stash made me want to try my hand at making stitch markers once again.

I thought I'll make a different kind of stitch markers than my previous attempt. I had about 4 mts of tiger tail wire in my jewelry-making stash and lots of crimp beads. So, after about 30 minutes, I had these in my hands!

These are so easy to make that I had to share the how-to with you guys. So, without much ado, lets move onto the tutorial. This is what you'll need to make these easy to make knitting stitch markers.


Step 6:
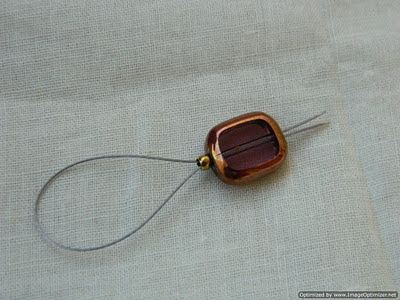
We are almost done. I promise. Get your wire cutter and cut the ends of the wire peeking outside the crimp bead flush against the crimp bead. Like this...

Ta da! your shiny new knitting stitch marker is done.

Now, go make gazillion stitch markers like this and admire them! I hope you like the tutorial and if you do make some stitch markers using this tutorial, do share the pics with me. :-) I'll be glad to see what you make.

This post is linked to WIP Wednesday hosted by Tami's amis.
-Josie

I thought I'll make a different kind of stitch markers than my previous attempt. I had about 4 mts of tiger tail wire in my jewelry-making stash and lots of crimp beads. So, after about 30 minutes, I had these in my hands!

These are so easy to make that I had to share the how-to with you guys. So, without much ado, lets move onto the tutorial. This is what you'll need to make these easy to make knitting stitch markers.

- A length of Tiger tail wire or Jewelry wire or any flexible wire.
- Beads
- Crimp beads
- Flat nose plier
- Wire cutter
For Bangaloreans, you can get all these materials in Itsy Bitsy.
Step 1:
Cut about 4 inches or 10 cm of the Tiger tail wire. Fold it into half and thread both the ends of the wire onto one crimp bead like this. If you don't want the stitch markers this long, reduce the length of the wire used to your preference.

Step 2:
Now thread both the ends of the wire through the bead like this.

Step 3:
Add another crimp bead to this. Thread both the ends of the wire through the crimp bead. Now, this is what you have..

Step 4:
Now, adjust the position of the beads on the wire so that a little bit of wire is peeking out of the second crimp bead like this.

Flatten the crimp bead near the ends of the wire with a flat nose plier like this.

Step 5:
Flatten the other crimp bead maintaining it close to the stitch marker bead. Like this...

Step 6:
We are almost done. I promise. Get your wire cutter and cut the ends of the wire peeking outside the crimp bead flush against the crimp bead. Like this...

Ta da! your shiny new knitting stitch marker is done.

Now, go make gazillion stitch markers like this and admire them! I hope you like the tutorial and if you do make some stitch markers using this tutorial, do share the pics with me. :-) I'll be glad to see what you make.

This post is linked to WIP Wednesday hosted by Tami's amis.
-Josie

Comments
Post a Comment
Thank you for visiting my blog. I would love to hear what you have to say...